

Muzzle Training Collies
This muzzle training guide is for dogs that already have an aversion to the muzzle as well as dogs that are completely new to muzzle training. With dogs that are already very fearful of the muzzle, we start training with a cardboard cup, just to get them used to putting their nose inside something, then transition to the muzzle. For dogs who are already really scared of the muzzle, start at sStep 1.
For dogs that are completely new to muzzle training, with no prior negative associations with waering a muzzle, start on Step 16.
In the steps below it’s important to move the item away from the dog’s nose rather than let him move his nose away - we don't want him to get into the habit of backing out of the muzzle.
Only train for a maximum of five minutes per session, and don’t try to move through all the stages in one session – you should only be working on one stage or at the most, 2 stages per training session.
In order to ensure that your dog is relaxed at every stage as we go through the muzzle training plan, see the following “ladder of aggression” diagram.
This shows how dogs communicate their anxiety right from just starting to be slightly anxious at the bottom of the ladder, through to actually biting at the top. So if, during any of the stages of muzzle training below, you see him lip licking, yawning or blinking, turning his head away, or any of the behaviours higher up on the ladder, stop training at that level and go back to the level before.

What type of muzzle?
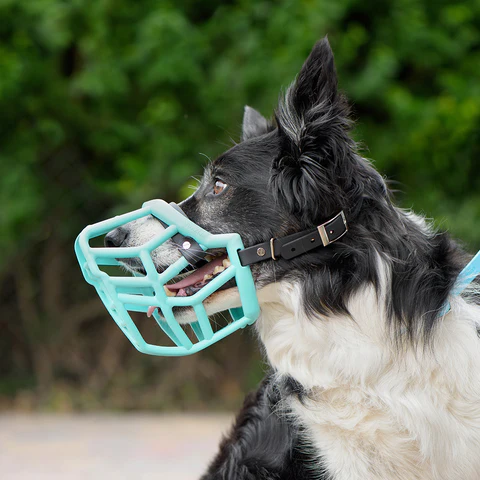
It's essential to use basket muzzles, which allow the dog room to sniff, pant and drink, as shown in the video below. I usually recommend the muzzle movement muzzles. They have plenty of room for dogs to pant, and they have a very handy hole in the end through which we can give dogs treats.
Muzzle Training Steps
Step 1:
Have the muzzle out and about in different places, but don’t pick it up next to your dog to start with.
Continue until your dog is no longer eyeing the muzzle or looking worried by it, then go on to step two.
Step 2:
Start to have the muzzle on your knee while sitting on the sofa or next to you when you’re doing things in the house and your dog is around.
Continue until your dog is no longer eyeing the muzzle or looking worried by it.
Step 3:
Very carefully pick up the muzzle while your dog is about, but not immediately next to you. Watch for any of the signs on the ladder of aggression, and don’t progress any further until you see no signs of anxiety and he appears to be relaxed,
Continue to practise this every day, along with steps 4-8, until you get to step 9.
Step 4:
Use cardboard coffee cup or parcel tape roll. Hold a treat through the item so that the dog has to put his nose slightly in to get the treat. Don’t press on his nose – just let him put his nose in gently. Take the item off the dog’s nose as soon as he has eaten the treat. Don’t move your hand towards the dog – hold the item with the treat the other side of it and wait for the dog to put his nose in.
Once your dog is excited to see the item you have been using and willingly puts his nose in it for the treat every time it is presented, 10 times in a row, move on to stage 5.
Step 5:
Present the item in the same way as in step 4, but without holding a treat one side of it. If your dog puts his nose anywhere near the item, mark him using your marker word and treat.
As before, don’t move the item towards the dog or push it onto the dogs nose. Hold it still. Once the dog has put his nose in or near the item, say your marker word and move it away from his nose.
Once he is regularly putting his nose near or on the item, ten consecutive times in a row, move on to stage 6.
Step 6:
Present the item in the same way as in step 4, keeping treats in your treat bag or pot. If your dog puts his nose into the item, mark him (using your marker word) and then reach into your treat bag and treat.
As before, don’t move the item towards the dog or push it onto the dogs nose. Hold it still. Once the dog has put his nose in the item, mark and move it away from his nose.
Once he is regularly putting his nose in the item, ten consecutive times in a row, move on to stage 7.
Step 7:
Exactly the same as stage three, but try and wait for just a tiny bit longer once he puts his nose in the item before marking him then treating.
Once the dog is regularly holding his nose in the item for slightly longer 10 times in a row, move on to stage 8.
Step 8:
As above, but wait until the dog puts his nose in the item for 2 seconds before marking (saying your marker word). As always, move the item away before the dog moves his nose away.
Don’t push it onto the dog’s nose at any time. Once the dog is regularly holding his nose in the item for 2 seconds 10 times in a row, move on to stage 9.
Step 9:
As stage 8, but have the muzzle on the floor nearby while you do the training with him with the parcel tape/coffee cup. Continue to mark and treat when he puts his nose in the item for 2-3 seconds. Once your dog is not showing any anxiety and can complete the stage 5 training with the muzzle nearby, move on to stage 10.
Step 10:
As stage 8, but have the muzzle on your knee while you do the training with him with the parcel tape/coffee cup. Continue to mark and treat when he puts his nose in the item for 2-3 seconds. Once your dog is not showing any anxiety and can complete the stage 5 training with the muzzle nearby, move on to stage 11.
Step 11:
Start to use the muzzle instead of the coffee cup/parcel tape, but go right back to step 4. Have the muzzle on the floor next to you or on your knee. Pick the muzzle up, without lifting it or putting it anywhere near your dog. If he stays next to you without looking worried, immediately put the muzzle down again, then mark and treat him. Don’t put the muzzle anywhere near your dog at present.
Once your dog is relaxed with you lifting up the muzzle and stays next to you for his treat, move on to stage 12.
Step 12:
As stage 11 but just lift the muzzle a little bit more towards your dog. If he stays next to you without looking worried, immediately put the muzzle down again, then mark and treat him. Don’t put the muzzle anywhere near your dog at present. Once your dog is relaxed with you lifting up the muzzle and stays next to you for his treat, move on to stage 13.
Step 13:
As stage 12 but lift the muzzle up even more so that it’s closer to your dog’s head. At the same time, lift up your other hand and give him a treat. Don’t try to make him put his head near the muzzle for now. Once your dog is relaxed with you lifting up the muzzle and stays next to you for his treat, move on to stage 14.
Step 14:
Hold a treat so that your hand is inside the muzzle and hold the treat in the dog’s end of the muzzle so that the dog has to put his nose very close to the muzzle to get the treat. Don’t press the muzzle on to his nose or move it towards him – just let him put his nose near the muzzle gently. Take the item away from the dog’s nose as soon as he has eaten the treat. Don’t move your hand towards the dog – hold the item with the treat the other side of it and wait for the dog to put his nose in. Once your dog is happy to put his nose very close to the muzzle to take the treats ten times in a row, move on to stage 15.
Step 15:
Hold a treat so that your hand is inside the muzzle and hold the treat in the dog’s end of the muzzle so that the dog has to put his nose just inside the muzzle to get the treat. Don’t press the muzzle on to his nose or move it towards him – just let him put his nose in gently. Take the item off the dog’s nose as soon as he has eaten the treat. Don’t move your hand towards the dog – hold the item with the treat the other side of it and wait for the dog to put his nose in. Once your dog is happy to put his nose just inside the muzzle to take the treats ten times in a row, move on to stage 16.
Step 16:
Present the item in the same way but without holding a treat one side of it – keep the treats in your treat bag or pot. We’re waiting to see if your dog volunteers to put his nose next to the muzzle, sniffing for a treat. If he puts his nose anywhere near the muzzle, mark him using your marker word and treat. If he doesn’t, go back to stage 15 for a few more trials then try again.
As before, don’t move the muzzle towards the dog or push it onto the dog’s nose. Hold it still. Once the dog has put his nose in or near the muzzle, click and move it away from his nose.
Once your dog is happy to put his nose next to the muzzle without reaching for a treat ten times in a row, move on to stage 17.
Step 17:
Present the muzzle in the same way as in stage 16, keeping treats in your treat bag or pot. If your dog puts his nose into the muzzle, click and then reach into your treat bag and treat.
As before, don’t move the muzzle towards the dog or push it onto the dogs nose. Hold it still. Once the dog has put his nose in the muzzle, mark and move it away from his nose. Once your dog is happy to put his nose just inside the muzzle without reaching for a treat ten times in a row, move on to stage 18.
Step 18:
Exactly the same as stage 17, but try and wait for just a tiny bit longer once he puts his nose in the item before marking then treating. Once your dog is successful ten times in a row, move on to stage 19.
Step 19:
As above, but wait until the dog puts his nose in the item for 2 seconds before marking. As always, move the item away before the dog moves his nose away.
Don’t push it onto the dog’s nose at any time. Once your dog is successful ten times in a row, move on to stage 20.
Step 20:
Aim to have the dog put his nose into the muzzle for approximately one extra second every couple of days before clicking and treating.
Step 21:
Start to work on the click of the clip that will eventually go behind the dog’s head.
So have the dog sat next to you on the floor, take the muzzle and click the clip shut. As soon as it clicks, give the dog a treat. Repeat 20 times every few days. Once your dog is showing no signs of anxiety, move on to step 22.
Step 22:
Once your dog can hold his nose in the muzzle for 10 seconds, hold the straps behind his head while he has his nose in there. Once your dog is showing no signs of anxiety, move on to step 23.
Step 23:
Start to do up the straps, then immediately undo them again and give the dog a treat. If your dog panics or tries to back off, go back to step 22 for longer. Once your dog is showing no signs of anxiety, move on to step 24.
Step 24:
Do up the straps and feed the dog through the end of the muzzle for 3 treats then remove it. Once your dog is showing no signs of anxiety, move on to step 25.
Step 25:
Do up the straps and feed the dog through the end of the muzzle for 10 treats then remove it. Don’t ever remove the muzzle if the dog is pawing at it or rubbing his nose on the floor. Get his attention with a treat so that he stops doing this first, then undo it. If he paws at the muzzle, go back to step 24 for longer.
Step 26:
We’re now at the stage where we can start to keep the muzzle on the dog for longer. Put it on very briefly when he has something interesting to do, such as on a walk for a few seconds, then take it off again. Start to build up the time he has it on by using it on a walk or when you can give him treats. If at any points he starts panicking, wait until he is calm before taking it off and then go back a few steps and build up again.
If you need any help with any aspect of muzzle training by following this plan, please don't hesitate to get in touch.